Poor screen alignment, uneven brightness, and signal issues can quickly derail an LED project. These problems often come from incorrect configuration, not faulty hardware. For resellers and integrators, this can lead to delays, rework, and unhappy clients.
That is where proper setup becomes critical. A well-configured Unilumin LED display delivers consistent visuals and reliable performance in professional environments.
Unilumin offers indoor LED solutions designed for corporate, control room, and presentation spaces. Within this range, both the Unilumin UTV SC and UTV SCS series support professional indoor deployments with consistent image output.
As a distributor, Bluechip IT supports partners with access to products, logistics, and technical guidance across Australia.
In this blog, we will walk through how to configure a Unilumin LED display using UTV SCS, step by step, so you can deliver stable and accurate LED screen deployments.
Why Proper LED Configuration Matters
Correct configuration directly affects performance. According to AVIXA, display quality issues such as incorrect brightness, colour mismatch, and resolution errors often stem from setup and calibration challenges rather than hardware defects.
Because of this, proper planning and configuration are essential. When done right, partners can avoid common issues and ensure consistent output across the entire LED screen.
What is UTV SCS?
The UTV SCS series is an indoor LED display solution built for professional environments. It is commonly used in corporate spaces, digital signage, and presentation settings.
It focuses on consistent brightness and colour across the display. This makes it suitable for close viewing applications.
In comparison, the Unilumin UTV SC series is also designed for indoor environments, particularly where fine-pitch clarity is required. Both series support professional use cases, although configuration principles remain similar.
Key characteristics include:
- Cabinet-based LED system
- Designed for fixed indoor installations
- Supports scalable display layouts
However, configuration is not just software based. Instead, it depends on both the physical layout and the control system. Therefore, understanding the full system is important before setting up.
Key Components Required for Configuration
Before starting, partners should understand the full LED system architecture.
LED Display Hardware
- UTV SCS LED cabinets or panels
- Power supply
- Receiving cards inside each cabinet
Control System
- Sending controller or video processor
- Receiving cards that manage signal distribution
Configuration Software
- LED control software, often called the Unilumin LED configurator
- Used to map, calibrate, and configure the display
Signal Source
- PC, media player, or AV system
Together, these components form the foundation of any indoor LED solutions deployment.
Pre-Configuration Requirements
Before configuring, careful planning is essential. Otherwise, errors can occur later.
Partners should:
- Confirm display layout, including rows and columns
- Verify pixel pitch and resolution requirements
- Ensure correct power distribution
- Check data cabling between cabinets
- Confirm compatibility between controller and panels
If these steps are skipped, mapping errors and inconsistent output may occur. Therefore, preparation saves time during installation.
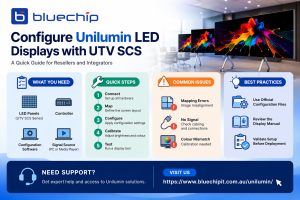
Step-by-Step: Configuring a Unilumin LED Display
Step 1: Connect Hardware
First, connect the sending controller to the signal source. Then, link the controller to LED cabinets using data cables. Finally, power on all components.
Step 2: Access Configuration Software
Next, launch the configuration software. Connect it to the controller. After that, detect all receiving cards in the system.
Step 3: Screen Mapping
This is the most critical step. Define the cabinet layout based on the physical setup. Then assign each receiving card to the correct position.
Make sure there is no overlap. Also ensure correct orientation across the display.
Step 4: Apply Configuration File
Load the factory configuration file if available. Otherwise, configure the parameters manually.
This step aligns resolution, cabinet size, and signal mapping.
Step 5: Adjust Display Settings
After mapping, adjust brightness and colour settings. Then check uniformity across panels.
Although UTV SCS supports consistent output, similar calibration practices also apply when working with the Unilumin UTV SC series. This ensures optimal results in each environment.
Need help planning your LED setup?
Get expert guidance and access to Unilumin solutions tailored for your project needs.
👉 Explore Unilumin Solutions with Bluechip IT
Step 6: Test the Display
Finally, run test patterns. Check for dead pixels, alignment issues, and colour differences. Then confirm full-screen signal output.
Testing ensures the system performs as expected before handover.
Common Configuration Issues
Even with proper setup, issues may occur. However, most have clear causes.
- Misaligned image: incorrect cabinet mapping
- No signal: cabling or receiving card issue
- Colour variation: calibration not applied
- Resolution mismatch: incorrect configuration file
Because of this, careful validation during setup is important.
Where Bluechip IT Supports Partners
Bluechip IT supports resellers and MSPs throughout the deployment process.
This includes:
- Pre-sales consultation to define the right solution
- Access to Unilumin LED products in Australia
- Guidance on system architecture and setup
- Logistics coordination for project delivery
However, Bluechip IT works alongside partners, not in place of them. This ensures integrators maintain control while receiving local support.

Best Practices for Resellers and Integrators
To improve outcomes, partners should follow these best practices:
- Always review the Unilumin LED display manual
- Validate system design before installation
- Use tested configuration files when possible
- Plan based on viewing distance and environment
- Coordinate early for product selection and compatibility
In addition, understanding factors that affect Unilumin LED price can help partners align solutions with client budgets.
Conclusion
Configuring a Unilumin LED display using UTV SCS follows a structured process. It involves hardware setup, controller configuration, and software mapping.
When done correctly, it delivers stable performance and consistent visual output.
Moreover, proper planning reduces errors and improves deployment efficiency.
Partners working with Bluechip IT gain access to local support, product availability, and guidance for both UTV SCS and Unilumin UTV SC deployments.
Explore Unilumin LED Solutions with Bluechip IT
See how Unilumin indoor LED solutions perform in real-world environments at our Experience Centre.
Make confident decisions with hands-on product insights and expert guidance.